<< return to Pixycam.com

User Tools

Site Tools


wiki:v2:lego_line_following_demo

Pixy2 LEGO Line Following Demo

This page describes how to make a LEGO robot that follows lines and makes turns at intersections as instructed. It's meant to be a basic introduction to the Pixy2's line following abilities.

Building the robot

The robot we're going to build can be found in Laurens Valk's book LEGO Mindstorms EV3 Discovery Book. The robot is called the Explor3r and it uses parts that are available in the retail Mindstorms EV3 kit.
  • Assemble Explor3r through step 11. Click here for instructions on how to build Explor3r. That is, stop short of mounting the IR Sensor (step 12). Instead of the IR Sensor, we'll be mounting Pixy2.
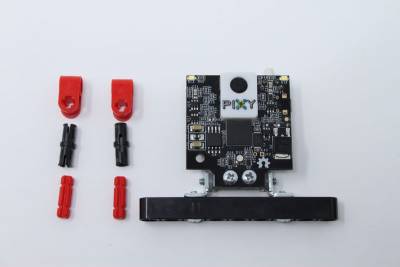
  • Locate these LEGO parts and your LEGO-mounted Pixy2. (There are instructions on how to mount Pixy2 to LEGO here)


  • Add these pieces to the Explor3r as shown

  • Attach Pixy2 and plug into port 1 as shown. Note how Pixy2 is pointed down (It's going to be tracking lines on the ground!)
  • Here's what the finished robot should look like. Note the angle that Pixy2 is looking at the ground.

Cables (IMPORTANT!)

  • The motors connect to motor ports A and B on your brick. Don't “cross” the cables. That is, if you are facing the motor ports (the back of the robot), the left motor connects to port B, the right motor connects to port A.
  • Pixy2 connects to sensor port 1.

Load Line Following Example

  • Turn on your LEGO brick if you haven't done so, and hook up a USB cable between your computer and your LEGO brick.
  • From the LEGO Mindstorms EV3 Software, go to the File menu and select Open Project.

     
  • Browse to the location where you unzipped the “LEGO blocks and examples” file (which you can download on this page), and then to the examples directory and select “line_follow.ev3” and click on Open. You should see a program that looks like this (below).

  • Draw a smooth line on a large sheet of paper using a black marker. Taping several standard-sized pieces of paper together to create a larger sheet of paper is a good approach. You can make a circle, oval, figure-eight, or something more complex, but keeping it simple is good for the first test.
  • Place your robot on the line that you've drawn and clicking on the play icon in the lower right corner of your EV3 software window.

  • Your robot should then follow the line. If it encounters an intersection (for example, if you drew a figure-eight), it should choose the straightest path because the Turn Angle is set to 0 (straight).

Troubleshooting

  • If your robot turns away from the line, make sure that the motor cables aren't crossed. That is, if you are facing the motor ports (the back of the robot), the left motor connects to port B, the right motor connects to port A.
  • If your robot starts turning left before the line curves to the left (for example), try tilting Pixy2 more downward toward the paper. That is, if Pixy2 is tilted too far up, it will see too much of the line in front of it and “anticipate” any turns. On the other hand, this might be what you want. :)
  • Although it's unlikely, sometimes the Vector can become “inverted” such that the Vector points down instead of up, which will cause your robot to back-up (reverse) instead of move forward. It will resolve itself because your robot will back-up and turn around such that the Vector is pointing up again, but it can be unexpected. The easiest way to prevent this is to place a blank sheet of paper in front of Pixy2 such that it loses the current Vector, then remove the paper before you start the program. After you remove the paper, Pixy2 will see the line in front of it, assign it as the Vector, and (by default) choose an upward orientation. Your robot will then move forward.

Making Turns at Intersections

If your line drawing has an intersection, you can tell your robot always turn left or always turn right (for example) by “hard-coding” the Turn Angle. With the program stopped, try setting the Turn Angle to -90 degrees.

-90 degrees is a right turn according to the diagram below.

Angle coordinates from Pixy2's perspective.

Re-run the program and notice that when it sees the intersection it will choose the right-most branch of the intersection and continue. In other words, it will always turn right when encountering an intersection. And more specifically, it will choose the branch that is closest to -90 degrees. Try setting the angle to 90 degrees and see what happens.

What's Next?

Can you extend this demo to make turns based on barcodes? Barcode images (including roadsigns!) are available here.

wiki/v2/lego_line_following_demo.txt · Last modified: 2019/01/31 01:43 by pixycam