Table of Contents
PixyMon v2 Reference
PixyMon v2 is an application that allows you to configure Pixy2 and see what it sees. It runs on several different platforms including Windows, MacOS and Linux, as well as other smaller embedded systems like Raspberry Pi and BeagleBone Black.
You can download the latest version of PixyMon v2 here.
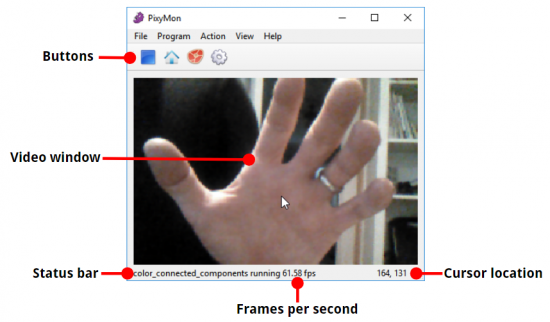
Here's what PixyMon v2 looks like:
- Buttons: these are the most common PixyMon actions, conveniently located at the top of the main window.
- Video window: this is where PixyMon renders various types of raw or processsed video.
- Status bar: this is where status messages are displayed.
- Frames per second: as part of the status bar, the frames per second (fps) are displayed.
- Cursor location: moving the mouse cursor across the video windows displays the image coordinates of the cursor.
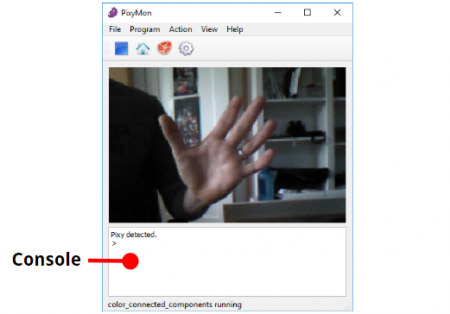
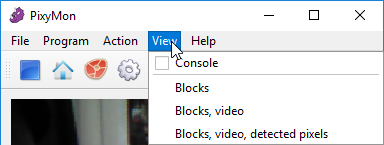
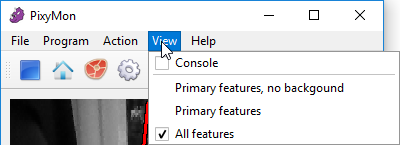
- Console: the console isn't normally displayed. It can be displayed by selecting it in the View menu in PixyMon. It allows commands and queries to be sent to Pixy2.
Menu and toolbar
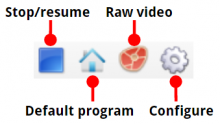
- Stop/resume: pressing this button stops the program that's currently running. This is useful when grabbing a frame or typing commands into the console window. Press this button again to resume the program.
- Default program: pressing this button runs the default program, which is the program that executes when Pixy2 powers up. The default program (by default!) is the color connected components program, but the default program can be configured.
- Raw video: pressing this button displays raw, unprocessed video.
- Configure: pressing this brings up the Configure Dialog, which contains various configurable parameters for Pixy2 and PixyMon.
- File: This menu contains items for saving, loading and restoring configuration parameters.
- Program: This menu contains the list of available programs on Pixy2, and allows you to change programs.
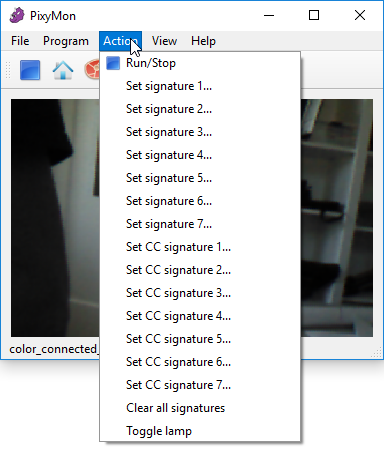
- Action: This menu changes based on which program Pixy2 is running. It contains the program-specific actions that are available to you. Refer to the specific program reference for the available actions and what they do, but common to all programs is an action to toggle the lamp. Try it by selecting Toggle lamp.
- View: This menu changes based on which program Pixy2 is running. It allows you to select what PixyMon displays. Refer to the specific program reference for the available views and what they display.
- Help: This menu contains a help link and an about dialog.
Configure dialog
Clicking on the gear icon  in the toolbar or selecting Configure in the File menu brings up the configure dialog.
Tuning and Expert tabs
The configure dialog changes dynamically based on which program is currently running on Pixy2, but mostly the Tuning and Expert tabs change when switching programs.
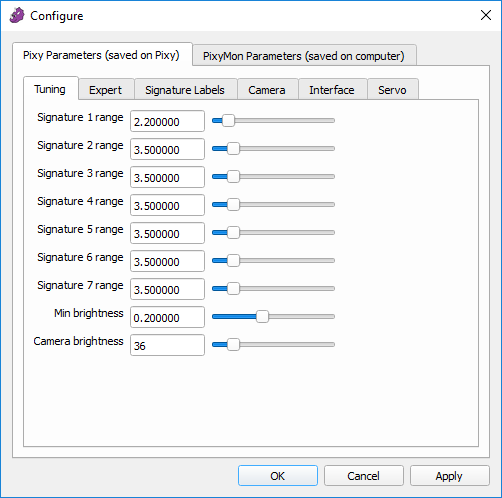
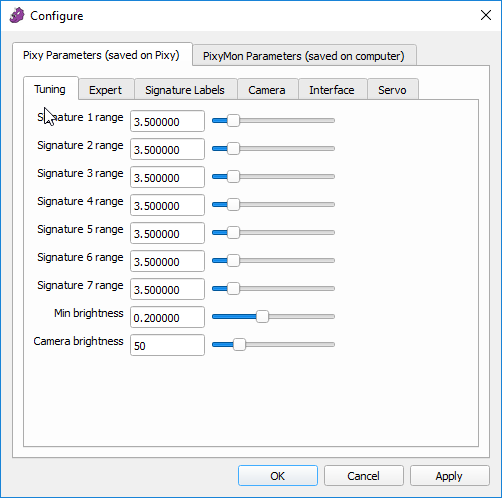
The Tuning tab contains the parameters you are most likely to want to adjust when running a particular program. For example, when running the color connected components program, the signature ranges are in the Tuning tab, because these are commonly tweaked to improve the object detection accuracy.
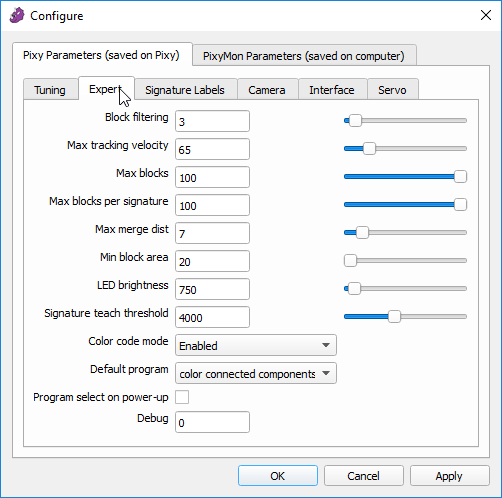
The Expert tab contains the parameters that are less commonly adjusted but can still be important for a particular program to function at its best. For example, when running the color connected components program, the maximum number of blocks allowed are in the Expert tab because this is commonly changed once or twice and left alone.
Refer to the particular program references for what the Tuning and Expert tabs do for each program.
Color connected components program
This program is a hue-based object detection algorithm. More information about the CCC program can be found here.
Color connected components Tuning tab
This tab contains all of the most effective parameters for “tuning” the accuracy of color signatures. To bring up this tab, you must be running the color_connected_components program by selecting it in the Program menu, and then bringing up the Configure Dialog (click on the gear icon  or select File➜Configure). Now select the Tuning tab under Pixy Parameters (it should be the first pane you see when you bring up the Configure Dialog.)
- Signature ranges: Signature range tuning is probably the most effective method to improve detection accuracy. Each color signature (1 through 7) has a slider to adjust the inclusiveness of the corresponding signature. Slide the slider to the left if you want the signature to be less inclusive (you're seeing false positives) or slide it to the right if you want the signature to be more inclusive (you're getting false negatives.) There is more information here.
- Min brightness: sets a minimum brightness setting for all signatures. That is, if a pixel is below the minimum brightness setting, it won't be considered as part of any color signature. So if you are seeing false positives that are sufficiently dark, you can adjust the Min brightness setting higher to reduce the false positives. If you are not able to detect objects that are sufficiently dark, you can adjust the Min brightness setting lower to reduce the false negatives
- Camera brightness: This parameter is in all Tuning tabs regardless of the program that's being run. It sets the exposure setting of Pixy, which controls the brightness of the image. The Camera Brightness setting is important because the correct exposure setting will lead to the best detection accuracy.
Color connected components Expert tab
This tab contains more advanced parameters for adjusting various color connected components things. To bring up this tab, you must be running the color_connected_components program by selecting it in the Program menu, and then bringing up the Configure Dialog (click on the gear icon  or select File➜Configure). Now select the Expert tab under Pixy Parameters.
- Block filtering: Increasing this parameter increases the amount of filtering Pixy2 applies to the detection of each block. Increasing this parameter can reduce the false positive detections, but will also increase the amount of time it takes between the object appearing in the frame and it being reported by Pixy2.
- Max tracking velocity: This parameter sets the maximum distance a detected object can travel between frames. In other words, objects that exceed this velocity will be considered invalid. Decreasing this parameter can reduce the false positive detections, especially if you don't expect your detected objects to move very much from frame to frame. The value is specified in pixels per frame period (16.7 milliseconds).
- Max blocks: This parameter sets maximum total number of blocks (objects) Pixy2 will report per frame. For example, if you set this parameter to 2, Pixy2 will report a maximum of 2 objects (the 2 largest objects) regardless of which signature the blocks belong to, and all other detected objects will not be reported.
- Max blocks per signature: This parameter sets the maximum number of blocks (objects) Pixy2 will report per signature, per frame. For example, if you set this parameter to 2, Pixy2 will report a maximum of 2 objects for each signature (the largest objects in the frame) and all other detected objects with that signature will not be reported.
- Max merge dist: Pixy2 will combine objects that have the same signature and are sufficiently close together in the frame. This parameter adjusts this distance. Increasing this parameter will result in Pixy2 merging more detected blocks together into a single block.
- * Min block area: sets the minimum area of reported blocks. If a detected block has a smaller area, it will not be reported. For this purpose, area of a block is calculated as width * height.
- LED brightness: sets the brightness of Pixy2's RGB LED. Pixy2's LED is quite bright if you want it to be (too bright to look at!)
- Signature teach threshold: This parameter applies when you are teaching Pixy2 a signature using the button-push method. It allows you to adjust how inclusive Pixy2 is when determining which pixels are part of the object you are trying to teach it. You can find more information here.
- Color code mode: This parameter sets the behavior of color codes, including enabling/disabling. Options include:
- Enabled: Color codes are enabled, normal mode.
- Disabled: Color codes are disabled.
- Color codes only: Only color codes are reported. Objects that match non-color-code signatures will not be reported.
- Mixed: This is the same as normal color code mode, but Pixy2 will also report color-code signatures that aren't part of color codes. (Normally, Pixy2 only reports color-code signatures that are part of color codes – 2 or more color-code signatures that are close together.)
- Default program: This parameter shows up in all Expert tabs regardless of the program that's currently running. It sets the program that gets executed upon power-up. The available programs are listed in the pulldown menu.
- Program select on power-up: This parameter shows up in all Expert tabs regardless of the program that's currently running. Enabling this will enable the button program selection upon power-up.
- Debug: This parameter shows up in all Expert tabs regardless of the program that's currently running. It sets the debug level within Pixy2. Setting the value to 0 means that no debugging information is displayed.
Signature Labels tab
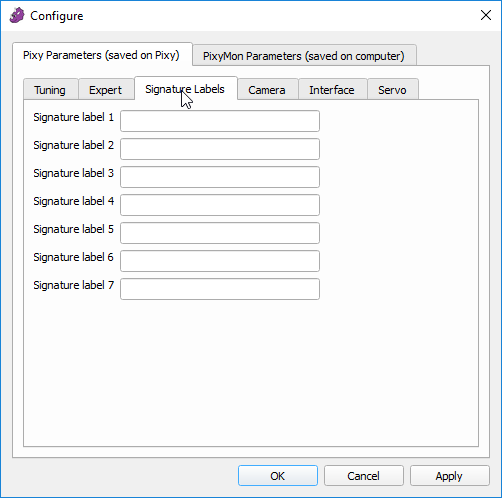
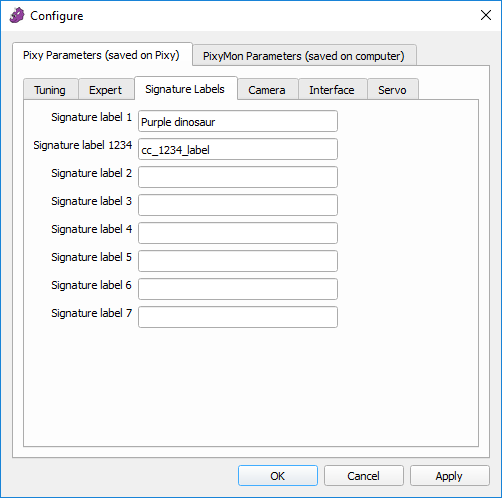
The Signature Labels tab allows you to label objects that are detected by Pixy2. To bring up this tab, you must be running the color_connected_components program by selecting it in the Program menu, and then bringing up the Configure Dialog (click on the gear icon or select File➜Configure). Now select the Signature Labels tab under Pixy Parameters.
Note that the signature labels are stored on Pixy2. So if you set some signature labels and then plug your Pixy into another computer running PixyMon, the labels will be there.
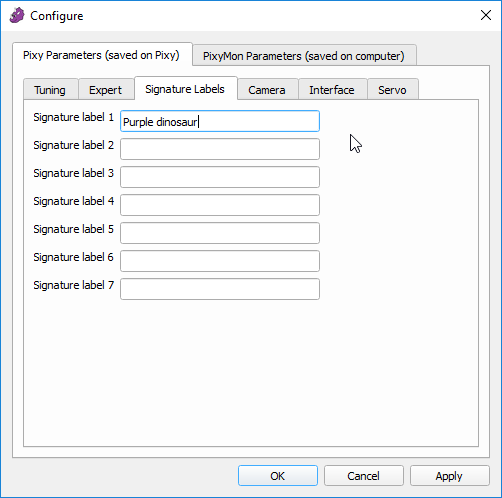
To label a signature, simply type in the label and click on Apply or OK.
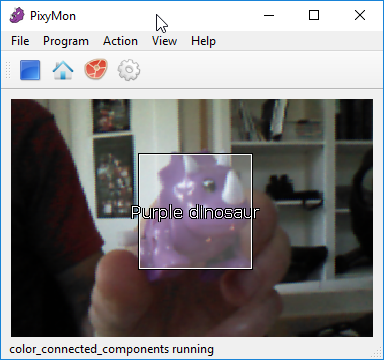
Detected objects that match this signature will then be labeled in PixyMon.
Labeling color codes
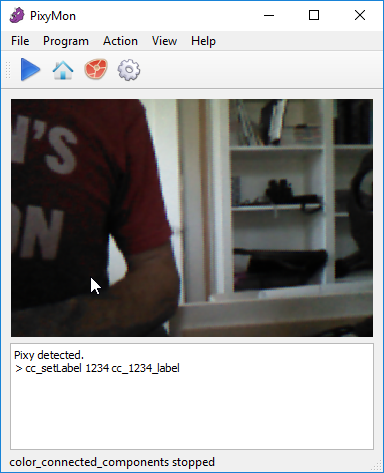
Labeling color coded objects requires typing commands into the console, since there are thousands of possible color codes. You can bring up the console by selecting Console in the View menu. Start by pressing the stop button.
Then type in the command cc_setLabel followed by the color code number (in octal) followed by the label. Note, if you want spaces in your label, use underscores instead. And don't forget to hit return!
Your label will then show up in the Signature Labels Tab as you'd expect, and any objects that match your color code will be labeled with the label you specified. (yay!)
Line tracking program
This program performs line tracking and is intended for robots that follow lines. More information about this algorithm can be found here.
Line tracking Tuning tab
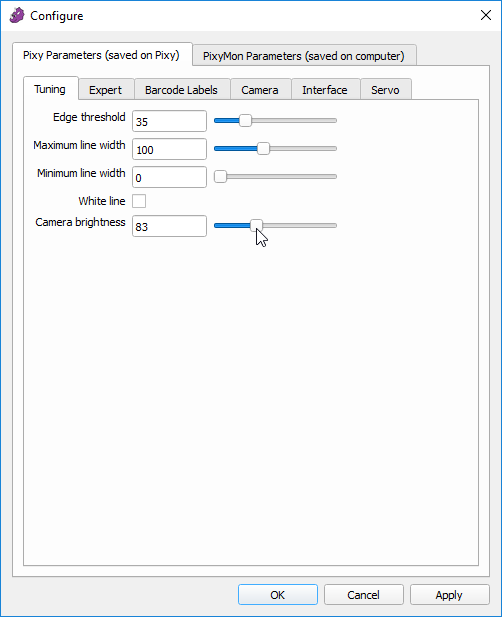
This tab contains all of the most effective parameters for “tuning” the accuracy of the line tracking algorithm. To bring up this tab, you must be running the line_tracking program by selecting it in the Program menu, and then bringing up the Configure Dialog (click on the gear icon  or select File➜Configure). Now select the Tuning tab under Pixy Parameters (it should be the first pane you see when you bring up the Configure Dialog.)
- Edge threshold: Adjusting this parameter determines how inclusive the line detection algorithm is. If the edge threshold is decreased, more potential lines will be detected. If it's increased, less potential lines will be detected. If Pixy2 isn't detecting the lines you want it to detect, this is likely the parameter that needs to be adjusted.
- Maximum line width: This adjusts the maximum width of the detected lines (in pixels.) Lines that are wider will not be detected.
- Minimum line width: This adjusts the minimum width of the detected lines (in pixels.) Lines that are narrower will not be detected.
- White line: Enabling this parameter will change Pixy2's line detection algorithm from dark lines on a light background to light lines on a dark background.
- Camera brightness: This parameter is in all Tuning tabs regardless of the program that's being run. It sets the exposure setting of Pixy, which controls the brightness of the image. The Camera Brightness setting is important because the correct exposure setting will lead to the best detection accuracy.
Line tracking Expert tab
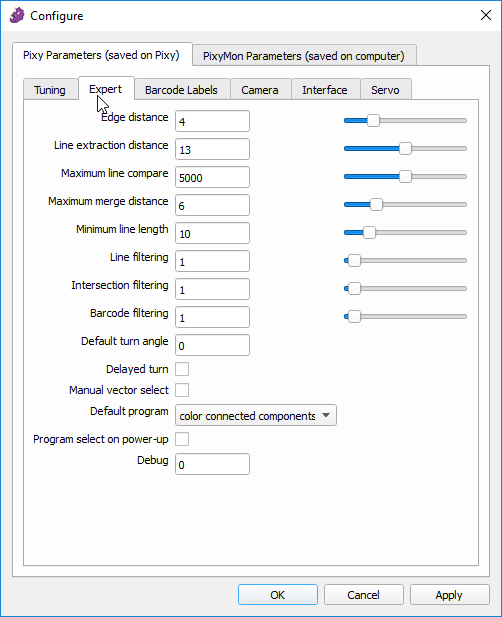
This tab contains more advanced parameters for adjusting various line tracking things. To bring up this tab, you must be running the line_tracking program by selecting it in the Program menu, and then bringing up the Configure Dialog (click on the gear icon  or select File➜Configure). Now select the Expert tab under Pixy Parameters.
Warning! These are “expert” parameters. Some are used for testing/debugging and furthermore may cause the line tracking algorithm to act strangely for some values. No smoke will pour out of your Pixy2 (that's good) but exercising a little caution is advised!
- Edge distance: This parameter adjusts the distance (in pixels) between the edge detector. Increasing this value will help detect edges that are less distinct (fuzzier), but increasing will affect the barcode detection and decoding – that is, it will increase the minimum barcode size.
- Line extraction distance: This parameter is used for testing/debugging and currently has no effect.
- Maximum line compare: This parameter can be thought of as maximum line velocity parameter for tracking lines between frames. For example, if a line moves from one side of the frame to the other side of the frame in one frame period (i.e. improbably large line velocity), it's probably not the same line, so this parameter is a sanity check for the tracking algorithm. Decreasing this value tells the algorithm to be more restrictive regarding the line velocity. Increasing the value tells the algorithm to be less restrictive regarding line velocity.
- Maximum merge distance: This parameter determines how far the line tracking algorithm searches for nearby lines that might form an intersection. If the lines you are trying to track are wider, you should increase this parameter until the intersections formed with the wider lines are accurately detected.
- Minimum line length: This tells the algorithm to throw out lines shorter than this parameter.
- Line filtering: Increasing this parameter leads to more filtering and can result in less false positive line detections, but with some added latency regarding when new lines are reported.
- Intersection filtering: Increasing this parameter leads to more filtering and can result in less false positive intersection detections, but with some added latency regarding when new intersections are reported.
- Barcode filtering: Increasing this parameter leads to more filtering and can result in less false positive barcode detections, but with some added latency regarding when new barcodes are reported.
- Default turn angle: This parameter sets the path the algorithm takes when encountering an intersection. The algorithm will pick the path that is closest to the specified angle. Turn angles are specified in degrees, with 0 being straight ahead, left being 90 and right being -90 (for example), although any valid angle value can be used. Valid angles are between -180 and 180. This parameter is usually set to 0, which essentially means “go straight at intersections (or pick the straightest path) unless I tell you otherwise.” Telling the algorithm otherwise is done through setNextTurn() in the API.
- Delayed turn: This parameter tells the algorithm to stop choosing paths at intersections automatically. It requires the client program to indicate the path with setNextTurn() in the API before the intersection goes out of frame. It's an extra expert option. It's included because sometimes you might not know which way to turn at the next intersection until you actually see the intersection (the number of branches and their angles, for example.) It's also useful? fun? to set it because PixyMon will dutifully label the intersections: “3-way intersection”, “4-way intersection”, etc. because it doesn't know which way to turn yet.
- Manual vector select: When the algorithm initializes, it needs to figure out which line should be the Vector, a.k.a. the line you want to follow. It will automatically choose the Vector based on some characteristics that it thinks are attractive, like a line that intersects the bottom of the frame and/or a line that is close to vertical. You can bypass this selection process by enabling this parameter. The algorithm will then set the Vector based on setVector() calls through the API.
- Default program: This parameter shows up in all Expert tabs regardless of the program that's currently running. It sets the program that gets executed upon power-up. The available programs are listed in the pulldown menu.
- Program select on power-up: This parameter shows up in all Expert tabs regardless of the program that's currently running. Enabling this will enable the button program selection upon power-up.
- Debug: This parameter shows up in all Expert tabs regardless of the program that's currently running. It sets the debug level within Pixy2. Setting the value to 0 means that no debugging information is displayed.
Pan-tilt demo program
This program demonstrates the pan-tilt unit. More information about the pan-tilt demo can be found here.
Pan-tilt demo Tuning tab
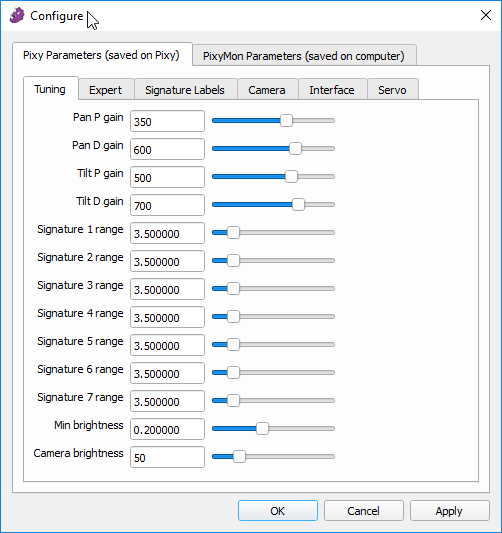
This tab contains all of the most effective parameters for “tuning” the pan-tilt demo. To bring up this tab, you must be running the pan_tilt_demo program by selecting it in the Program menu, and then bringing up the Configure Dialog (click on the gear icon  or select File➜Configure). Now select the Tuning tab under Pixy Parameters (it should be the first pane you see when you bring up the Configure Dialog.)
It is recommended to use this demo with the pan-tilt unit. And here's how to run the pan-tilt demo.
The proportional and derivative gains can improve the motion of the pan-tilt. For example, if the tilt axis is oscillating rapidly, try decreasing the tilt axis proportional gain and increasing tilt axis derivative gain. Note, the PD gains can be set to negative values if your pan or tilt axis has an opposite sign.
- Pan P gain: This sets the pan axis proportional gain.
- Pan D gain: This sets the pan axis derivative gain.
- Tilt P gain: This sets the tilt axis proportional gain.
- Tilt D gain: This sets the tilt axis derivative gain.
- Signature ranges: Signature range tuning is probably the most effective method to improve detection accuracy. Each color signature (1 through 7) has a slider to adjust the inclusiveness of the corresponding signature. Slide the slider to the left if you want the signature to be less inclusive (you're seeing false positives) or slide it to the right if you want the signature to be more inclusive (you're getting false negatives.) There is more information here.
- Min brightness: sets a minimum brightness setting for all signatures. That is, if a pixel is below the minimum brightness setting, it won't be considered as part of any color signature. So if you are seeing false positives that are sufficiently dark, you can adjust the Min brightness setting higher to reduce the false positives. If you are not able to detect objects that are sufficiently dark, you can adjust the Min brightness setting lower to reduce the false negatives
- Camera brightness: This parameter is in all Tuning tabs regardless of the program that's being run. It sets the exposure setting of Pixy, which controls the brightness of the image. The Camera Brightness setting is important because the correct exposure setting will lead to the best detection accuracy.
Pan-tilt demo Expert tab
This tab contains more advanced parameters for adjusting various pan-tilt demo things. To bring up this tab, you must be running the pan_tilt_demo program by selecting it in the Program menu, and then bringing up the Configure Dialog (click on the gear icon  or select File➜Configure). Now select the Expert tab under Pixy Parameters.
Note, this tab is the same as the color connected components expert tab.
- Block filtering: Increasing this parameter increases the amount of filtering Pixy2 applies to the detection of each block. Increasing this parameter can reduce the false positive detections, but will also increase the amount of time it takes between the object appearing in the frame and it being reported by Pixy2.
- Max tracking velocity: This parameter sets the maximum distance a detected object can travel between frames. In other words, objects that exceed this velocity will be considered invalid. Decreasing this parameter can reduce the false positive detections, especially if you don't expect your detected objects to move very much from frame to frame. The value is specified in pixels per frame period (16.7 milliseconds).
- Max blocks: This parameter sets maximum total number of blocks (objects) Pixy2 will report per frame. For example, if you set this parameter to 2, Pixy2 will report a maximum of 2 objects (the 2 largest objects) regardless of which signature the blocks belong to, and all other detected objects will not be reported.
- Max blocks per signature: This parameter sets the maximum number of blocks (objects) Pixy2 will report per signature, per frame. For example, if you set this parameter to 2, Pixy2 will report a maximum of 2 objects for each signature (the largest objects in the frame) and all other detected objects with that signature will not be reported.
- Max merge dist: Pixy2 will combine objects that have the same signature and are sufficiently close together in the frame. This parameter adjusts this distance. Increasing this parameter will result in Pixy2 merging more detected blocks together into a single block.
- * Min block area: sets the minimum area of reported blocks. If a detected block has a smaller area, it will not be reported. For this purpose, area of a block is calculated as width * height.
- LED brightness: sets the brightness of Pixy2's RGB LED. Pixy2's LED is quite bright if you want it to be (too bright to look at!)
- Signature teach threshold: This parameter applies when you are teaching Pixy2 a signature using the button-push method. It allows you to adjust how inclusive Pixy2 is when determining which pixels are part of the object you are trying to teach it. You can find more information here.
- Color code mode: This parameter sets the behavior of color codes, including enabling/disabling. Options include:
- Enabled: Color codes are enabled, normal mode.
- Disabled: Color codes are disabled.
- Color codes only: Only color codes are reported. Objects that match non-color-code signatures will not be reported.
- Mixed: This is the same as normal color code mode, but Pixy2 will also report color-code signatures that aren't part of color codes. (Normally, Pixy2 only reports color-code signatures that are part of color codes – 2 or more color-code signatures that are close together.)
- Default program: This parameter shows up in all Expert tabs regardless of the program that's currently running. It sets the program that gets executed upon power-up. The available programs are listed in the pulldown menu.
- Program select on power-up: This parameter shows up in all Expert tabs regardless of the program that's currently running. Enabling this will enable the button program selection upon power-up.
- Debug: This parameter shows up in all Expert tabs regardless of the program that's currently running. It sets the debug level within Pixy2. Setting the value to 0 means that no debugging information is displayed.
Video program
The video program displays video – simple! It can also be used to get red, green and blue pixel values of specified locations within the video images. Check out the video API for more details.
We noticed that several Pixy1 users were using Pixy to just sense color values, but using the color connected components algorithm to do so.
To make these kinds of color sensing applications easier (we're talking to you, Rubik's cube solvers!), we added the getRGB() function to the video program. We won't be giving any TED talks on this feature, but we hope it's useful. :)
Note, PixyMon displays the x, y mouse location in image coordinates in the lower right corner of the main window to help determine the coordinates to request from getRGB().
Video Tuning tab
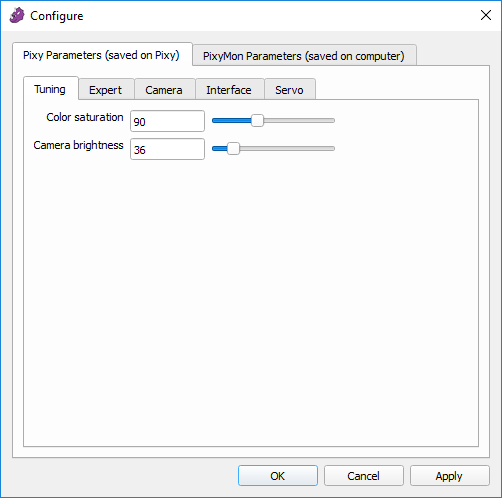
This tab contains all of the most effective parameters for “tuning” the video. To bring up this tab, you must be running the video program by clicking on the Raw video icon  in the toolbar, or selecting it in the Program menu, and then bringing up the Configure Dialog (click on the gear icon
  or select File➜Configure). Now select the Tuning tab under Pixy Parameters (it should be the first pane you see when you bring up the Configure Dialog.)
- Color saturation: This parameter sets the relative color saturation of the video. Decreasing the saturation value yields video that has no color. Increasing the value yields video that has exaggerated color.
- Camera brightness: This parameter is in all Tuning tabs regardless of the program that's being run. It sets the exposure setting of Pixy, which controls the brightness of the image. The Camera Brightness setting is important because the correct exposure setting will lead to the best detection accuracy.
Video Expert tab
This tab (for now) doesn't contain much. In subsequent versions it may contain more advanced parameters for adjusting various video things. To bring up this tab, you must be running the video program by clicking on the Raw video icon  in the toolbar, or selecting it in the Program menu, and then bringing up the Configure Dialog (click on the gear icon
  or select File➜Configure). Now select the Expert tab under Pixy Parameters.
- Default program: This parameter shows up in all Expert tabs regardless of the program that's currently running. It sets the program that gets executed upon power-up. The available programs are listed in the pulldown menu.
- Program select on power-up: This parameter shows up in all Expert tabs regardless of the program that's currently running. Enabling this will enable the button program selection upon power-up.
- Debug: This parameter shows up in all Expert tabs regardless of the program that's currently running. It sets the debug level within Pixy2. Setting the value to 0 means that no debugging information is displayed.
Other configure tabs
Camera tab
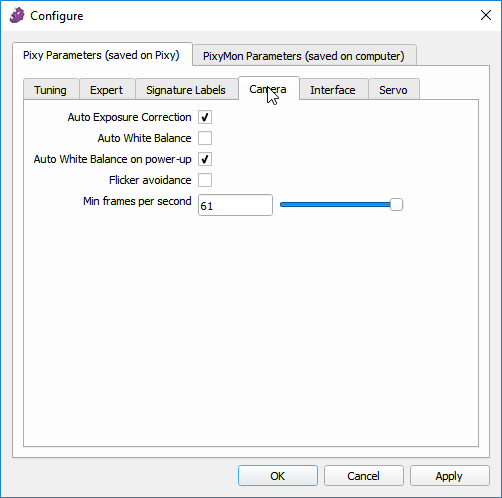
This tab contains parameters for configuring how Pixy2 acquires images for processing. These parameters are considered to be “advanced”, so you should avoid changing them unless you have a good understanding of what they do! The Camera tab is present regardless of the program that is running on Pixy2. To bring up the Camera tab, first bring up the Configure Dialog (click on the gear icon or select File➜Configure). Now select the Camera tab under Pixy Parameters.
- Auto Exposure Correction: Enabling this parameter enables an algorithm that automatically adjusts Pixy2's exposure in response to the ambient light – more ambient light results in less exposure, and less light results in more exposure. Disabling this parameter will turn off this algorithm and save Pixy2's current exposure setting in flash so it can be used for subsequent power cycles. Additionally, if you disable Auto Exposure Correction, the Camera brightness parameter in the Tuning tab will no longer adjust the exposure/brightness.
- Auto White Balance: Enabling this parameter enables an algorithm that automatically adjusts the blue and red channel gains (the “balance”) such that white objects appear white. This parameter is disabled by default to prevent the colors that Pixy2 perceives from drifting, because this will also affect the color signatures and their accuracy. When this parameter is disabled, Pixy2's current white balance setting will be saved in flash so it can be used for subsequent power cycles (asssuming Auto White Balance on power-up is also disabled). You can enable Auto White Balance temporarily by clicking on the box (enabling) and Pixy2 will perform white balancing until you click the box again to disable. Disabling Auto White Balance and Auto White Balance on power-up may be an effective way to retain the accuracy of your color signatures for a given environment.
- Auto White Balance on power-up: Enabling this parameter will make Pixy2 turn on auto white balance for the first 5 seconds upon power-up. This is useful because most users want Pixy2 to adjust its white balance based on the ambient conditions, but not to continuously update the white balance such that colors (and signatures) drift over time. When this parameter is disabled, Pixy2 will not enable auto white balance upon power-up. Disabling Auto White Balance and Auto White Balance on power-up may be an effective way to retain the accuracy of your color signatures for a given environment.
- Flicker avoidance: If Pixy2's images are flickering because of the flickering of the lighting, enabling this parameter will prevent the flickering. Flickering tends to happen more often with fluorescent lighting. Enabling this may lead to overexposure in bright sunlight, however.
- Min frames per second: This allows Pixy2 to choose a lower framerate to reduce noise and/or increase brightness in dimly lit environments. That is, lower framerates allow for longer exposures. If there is sufficient light in the environment, the framerate will increase above this value, but if there is insufficient light in the environment the framerate will be lowered until it possibly reaches this value at which point it will maintain the minimum frames per second. In general, set this value to the minimum frames per second your application can tolerate. Pixy2 will then choose the optimum framerate given the amount of light in the environment.
Interface tab
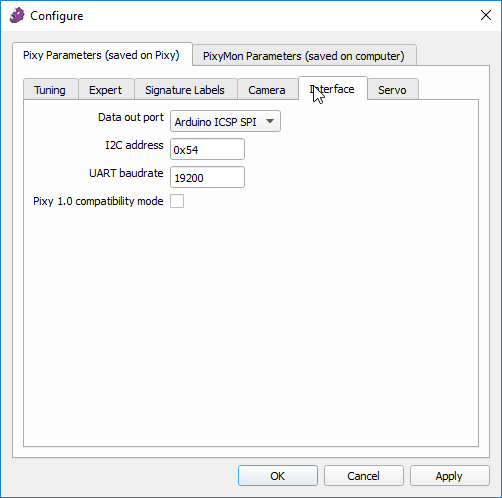
This tab contains parameters for configuring how Pixy2 communicates its results (what it senses) to the world. Pixy2 uses one of several interfaces to do this – UART, SPI, I2C, USB and analog/digital output. The Interface tab is present regardless of the program that is being run on Pixy2. To bring up the Interface tab, first bring up the Configure Dialog (click on the gear icon or select File➜Configure). Now select the Interface tab under Pixy Parameters.
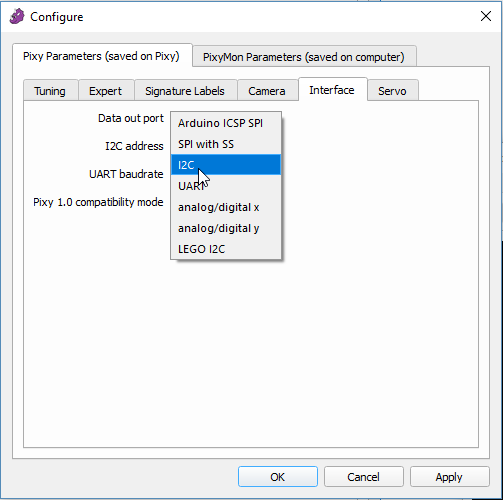
- Data out port: This parameter selects the output port.
- Arduino ICSP SPI: This is the default port that is used to communicate with Arduino through the ICSP connector.
- SPI with SS: This is the same as the Arduino ICSP SPI except that it includes support for Slave Select, which is commonly used with SPI.
- I2C: This selects I2C, which is a common multi-drop 2-wire port.
- UART: This is the common “serial port”, or asynchronous serial.
- analog/digital x: This will output the x value of the largest detected object as an analog value. It also outputs whether an object is detected or not as a digital signal.
- analog/digital y: This will output the y value of the largest detected object as an analog value. It also outputs whether an object is detected or not as a digital signal.
- I2C address: This parameter sets Pixy2's I2C address if the Data out port is set to I2C.
- UART baudrate: sets the baud rate if the Data out port is set to UART.
- Pixy 1.0 compatibility mode: Pixy2 uses a different serial protocol than the original Pixy. The new protocol is simpler and supports multiple modalities, but if you want to use Pixy2 with your original Pixy Arduino programs, you can enable this parameter and Pixy2 will switch to the original Pixy serial protocol. Note, this parameter only applies to SPI, UART, and I2C interfaces – not USB. Additionally, it only applies to the color_connected_components program.
Servo tab
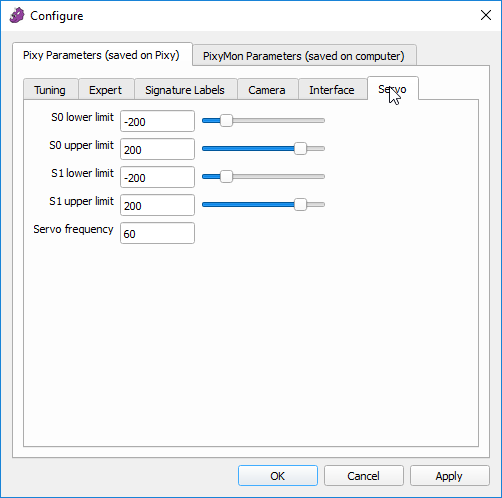
This tab contains parameters for configuring the two RC-servo ports on Pixy2. The port pinouts, as well as which port is which can be found here. The Servo tab is present regardless of the program that's running on Pixy2. To bring up the Servo tab, first bring up the Configure Dialog (click on the gear icon or select File➜Configure). Now select the Servo tab under Pixy Parameters.
Different brands of RC-servos tend to require different timings, which can lead to the servos moving more or less than desired or that they are capable of. This dialog can help address these differences.
- S0 lower limit: This parameter sets the lower limit of servo 0.
- S0 upper limit: This parameter sets the upper limit of servo 0.
- S1 lower limit: This parameter sets the lower limit of servo 1.
- S1 lower limit: This parameter sets the upper limit of servo 1.
- Servo frequency: measured in Hz, this parameter sets the frequency of the PWM signal that controls both servos.
Note: the lower limit values control how far clockwise the servos move, with more negative being farther clockwise. The upper limit values control how far counter-clockwise the servos move, with more positive being farther counter-clockwise.
You can test the limits by issuing servo move commands from the console window. You can bring up the console window by selecting Console in the View menu. Hit the stop button and type in the following commands:
- “rcs_setPos 0 0” moves servo 0 to its clockwise limit
- “rcs_setPos 0 1000” moves servo 0 to its counter-clockwise limit
- “rcs_setPos 1 0” moves servo 0 to its clockwise limit
- “rcs_setPos 1 1000” moves servo 0 to its counter-clockwise limit
PixyMon parameters tab
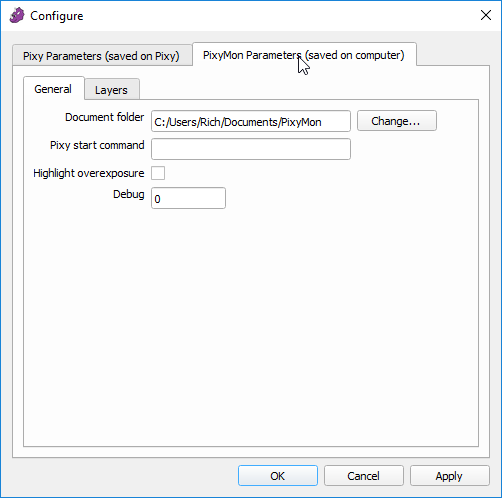
This tab contains parameters for configuring various PixyMon related features. To bring up the Interface Tab, first bring up the Configure Dialog (click on the gear icon or select File➜Configure). Now select the PixyMon Parameters.
- Document folder: This is the path where PixyMon saves grabbed images as well as its configuration (config.xml).
- Pixy start command: This is the command that PixyMon sends to Pixy when Pixy is first plugged into your computer via USB or when PixyMon is first run.
- Highlight overexposure: Pixy needs to get the correct exposure setting, or its images won't contain enough dynamic range, and detection accuracy will suffer. When enabling Highlight overexposure, PixyMon will highlight regions of the image that are overexposed by showing them as black pixels. You can adjust the exposure by adjusting the Camera Brightness setting in the Signature Tuning tab. There is more detailed information here.
- Debug: Setting this to 1 or higher will enable debug messages for PixyMon.
Grab and Save a Frame in PixyMon
Grabbing and saving a video frame in PixyMon is straightforward. Just select File➜Save Image. That's it – the saved image will then be saved in the documents directory. You can choose to press the stop button if you wish, or you just grab/save the image frame on-the-fly.
Save/load/restore Pixy2's parameters
Pixy2 stores several parameters such as the color signatures, signature ranges, servo limits, data out port, UART baudrate, etc. in flash memory so they can be recalled and used for subsequent power cycles. You can save these parameters on your computer and reload them onto your Pixy2 later, or even copy them onto another Pixy2.
Saving parameters
You first need to save the parameters into a local file onto your computer. Select File➜Save Pixy parameters… PixyMon will bring up a file selection dialog. Choose a suitable filename and press OK. The parameters will then be transferred from your Pixy and saved in the file you chose.
Loading parameters
To load previously saved parameters onto your Pixy2, select File➜Load Pixy parameters… PixyMon will bring up a file selection dialog. You can then choose the file you previously saved and press OK. PixyMon will then load the parameters contained in the file onto your Pixy2.
Restoring default parameters
To restore the default values for all of Pixy2's parameters, select File➜Restore default parameters. Pixy2 will then write all of the default parameters for you.
Uploading new firmware
Pixy2 uses a ROM-based algorithm to upload new firmware into flash memory over USB, which makes Pixy2 “unbrickable” - that is, you will always be able to recover Pixy2 from an unsuccessful firmware upload or a “bad” version of firmware.
The First Time You Upload Firmware
Start like this:
- PixyMon is running on your computer.
- You have your new firmware file available somewhere on your computer. You can find the latest version here.
Now do these steps (please):
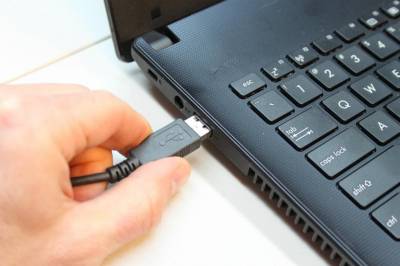
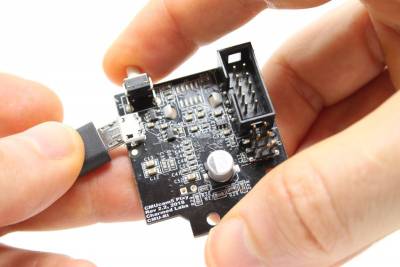
- Make sure Pixy2 is NOT plugged in to a USB cable.
Holding the button down while connecting Pixy2 to USB puts Pixy2 in “firmware upload mode”. Since this is the first time you have uploaded firmware onto Pixy2, your computer will go through a driver installation process. This is because Pixy2 uses a separate device driver for firmware upload, and your computer hasn't seen this device on its USB port before (Note: this only happens if you're using a Windows computer. If you're using a Mac or Linux machine, scroll down to the “Pixymon” section and skip this driver installation business).
Windows Vista, 7, 8, or 10
You should get a small message in the system tray similar to this one:
Wait for the driver to finish installing, which shouldn't require any actions on your part, just some waiting.
Windows XP
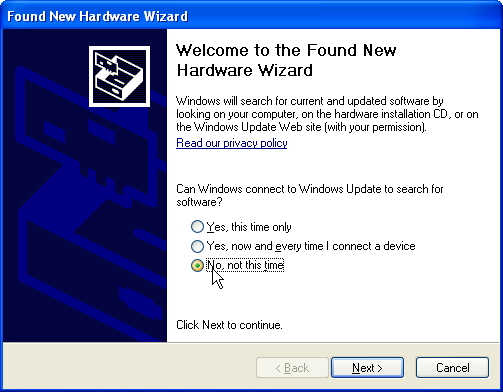
You should get the New Hardware Wizard
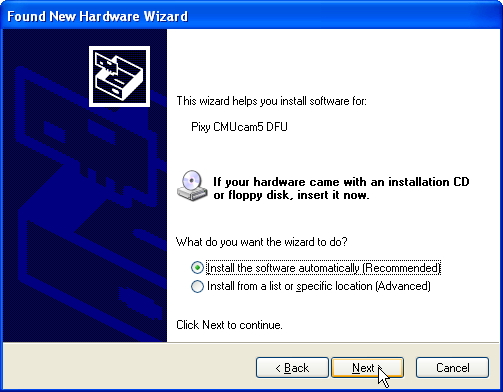
Click on “No, not this time” and then “Next”. In the next dialog, *click on “Install the software automatically” and then “Next”.
The driver will then be installed. Wait for this to finish before continuing.
MacOS or Linux
No special steps need to be taken.
What you should see
In the PixyMon console (at the bottom of the PixyMon window) you should see the message “Pixy programming state detected”. If you don't see this message, the drivers may still be installing. Just wait a little more.
Then a file selection dialog will appear. Browse to your new firmware file (it's a .hex file) and select it, then press OK. Pixy2 will then take the new program and write it into its flash memory. It's quick – it only takes 5 seconds or so. When it's done uploading the new firmware will start running.
You're done!
The next time you upload firmware
The next time you upload firmware, the drivers will be installed, so you just need to initiate firmware upload mode by holding down the button while plugging in the USB cable.
